Semantic Release
What is Semantic Release
Semantic Release automates the whole package release workflow including: determining the next version number, generating the release notes, and publishing the package. More information about semantic-release available on their site.
Install Node.js
Semantic Release use Node.js, so first we have to install Node.js. Follow the relevant guide for your operating system on the Node.js website.
Install Semantic Release
The recommended way to install Semantic Release is to use a local installation and add Semantic Release to the development dependencies. We can achieve this with the following command:
With Semantic Release installed we have to add a couple plugins to handle certain activities like, updating the CHANGELOG.md and to push to our repository.
We are going to install the following recommended plugins:
- semantic-release/changelog to update a CHANGELOG file
- semantic-release/git to commit release assets to the project's git repository
- conventional-changelog-conventionalcommits to implement the specification described at conventionalcommits.org
To make commits easier we can also install cz-cli, which provides an easy-to-use interface for creating valid conventional commits.
- cz-cli to manage our commit messages
Tip
To avoid committing the entire node_modules directory use gitignore.io and add node relevant ignores to our .gitignore file. This will include all the Node.js relevant files and directories which should not be committed to Git.
npm install --save-dev semantic-release/changelog
npm install --save-dev semantic-release/git
npm install --save-dev conventional-changelog-conventionalcommits
npm install --save-dev commitizen
Configure CI Pipeline
GitHub
Semantic Release requires push access to the project Git repository in order to create Git tags and update the CHANGELOG.md. Currently, only personal access tokens are supported on GitHub
Create a personal access token
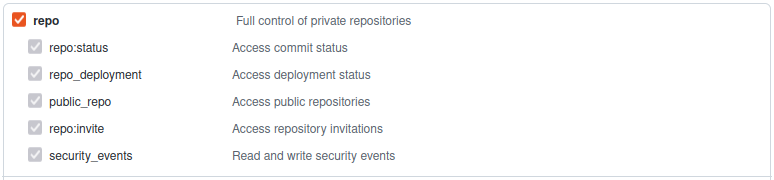
Open your GitHub profile and request a new classic token for Semantic Release with repo rights.
Next we have to add this token as a secret to our repository, so we can use it in our CI pipeline. Go to your repository configuration. Select Secrets and variables → Actions and choose New Repository secret. Pick a secret name and upload the generated token.
In this guide we are using RELEASE_TOKEN for this purpose.

Note
Other plugins might need more secrets to work properly, for example release plugins which push images to docker, PyPI or other repositories. See each plugin's documentation for the environment variables required.
Failure
Semantic Release will fail with this workflow if the target branch is protected against pushes. If your target branch is protected follow the steps on this page.
Set up a Workflow
GitHub uses yaml files in the .github/workflows directory to define our workflows for GitHub Actions. The following is a minimal configuration for semantic-release with a build running on the latest LTS version of Node when a new commit is pushed to a master or main branch. See Semantic Release documentation for additional configuration options.
name: Release
on:
  push:
    branches:
      - master
      - main
jobs:
  release:
    name: Release
    runs-on: ubuntu-latest
    steps:
      - name: Checkout
        uses: actions/checkout@v3
        with:
          fetch-depth: 0
          persist-credentials: false
      - name: Setup Node.js
        uses: actions/setup-node@v3
        with:
          node-version: "lts/*"
      - name: Install dependencies
        run: npm ci
      - name: Release
        env:
          GITHUB_TOKEN: ${{ secrets.RELEASE_TOKEN }}
        run: npx semantic-release
Lock the Node.js packages
To make sure we install the same version of Node.js packages what we have locally to the CI environment we have to lock package version.
Configure cz-cli
The cz-cli expecting a Commitizen-friendly repository. We can make our repository Commitizen-friendly by running the following command.
Running Commitizen on git commit
With the default setup to use Commitizen we have call git cz or cz. To incorporate Commitizen into our regular git workflow we have to use a git hook. This is useful o ensure the proper commit format is enforced on contributions from those unfamiliar with Commitizen.
Traditional git hooks
Update .git/hooks/prepare-commit-msg with the following code:
Why exec < /dev/tty?
By default, git hooks are not interactive. This command allows the user to use their terminal to interact with Commitizen during the hook.